

Flows | Use Flows to Bulk Update Records from List View in Salesforce
Create a List View Button using a Screen Flow
Let's see how to create a List View Button to invoke a Screen Flow in Salesforce. We will use a complete declarative approach to achieve this which means:
No coding.
No custom components.
Only standard Flow features.
Only declarative, standard salesforce tool available on all editions (including Essentials)
Future-proof and rock solid.
In this article, you will learn how to Pass Selected Records from List View to a Salesforce Flow.
Requirement - Flow List View Button - Declarative tools only
A while ago, I came across a very weird requirement from my customer. We had to create a system, which would get fully dependent on no-coding tools. They wanted to make a PoC (Proof of Concept) for their larger implementation team.
They were doing this because some of their departments had to be administered by independent teams, and they wanted to make the system easier to maintain.
One of the user stories involved Bulk Updates of the Account records. It was a pretty sophisticated algorithm pulling many related records and doing some serious things. When I first saw the requirement, I immediately pointed out that this is impossible without creating a custom component. Still, the PO of the project gave me one day to do my research and find a workable solution that would use only DECLARATIVE tools. No coding. No custom components. Stuff that could be done by an administrator without extensive Salesforce knowledge. And I found one working method, worth sharing with you.
In a nutshell, here’s what we are going to do:
Create a Screen Flow with a special type of input variable, “ids”
Create List Button using old good List Buttons (not global actions, no custom components)
Simple as that. But let’s get our hands dirty and see how it works.
Creating the Screen Flow to work as List View Button
First things first, we will have to create a Screen Flow.
Go to Setup
Quick Find -> Flow
New Flow
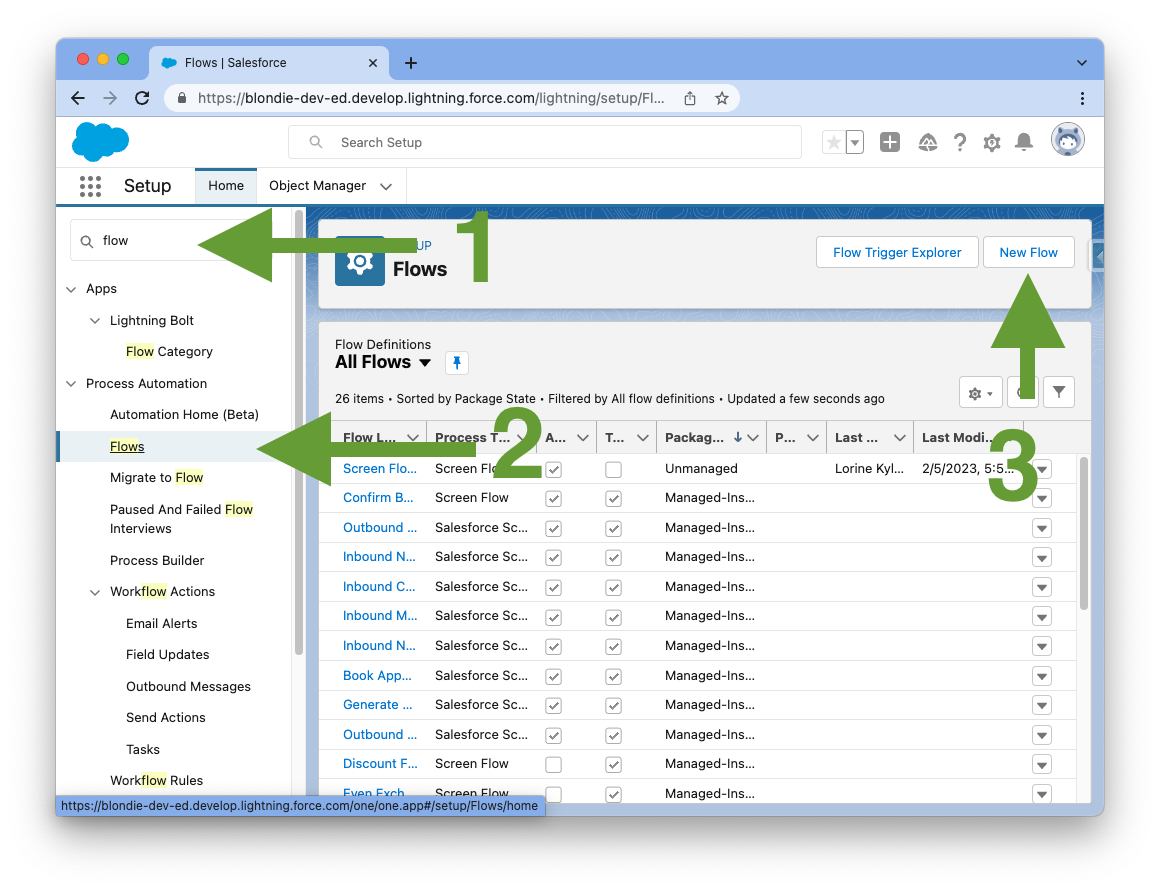
A new tab will pop up. You need to select Screen Flow

Click Create
Creating Variables
Now that we have created a shiny new flow, it’s time to create a couple of variables. I will explain how some poorly documented features of the Salesforce Flow work.
Creating ids Variable
First things first, I need to introduce you to the variable “ids”. ids variable is a Salesforce system variable, which allows you to pass multiple record ids into it. I will show you later how simple it is to use it, but first, some considerations about ids variable
ids variable is case sensitive. Do not use “Ids”, “IDS” or “IDs”. It will not work; it should be all lowercase.
When Salesforce passes values to the ids variable, they are separated by a comma. To avoid complicated extraction of record ids from text variables use the Collection Variable type of variable in the flow (we’ll get back to this in a while).
Now let’s create “ids” variable, which will store the data about our selection.
Locate Sidebar in the Flow
Click New Resource
Create new variable
Resource Type: Variable
API Name: ids (remember, it’s case sensitive)
Data Type: Text
Allow multiple values (collection): TRUE (check the checkbox)
Available for input: TRUE (check the checkbox), by checking this checkbox, we are telling Salesforce that this variable could be passed to the flow from the system. In our case, it will pass via Salesforce standard tools, after we create a list view button later in this tutorial.
Click DONE

Creating Record Variables
Next, we will create another two variables. Those two will be used to store information about bulk changes we would like to make with the selected records. For simplicity I will be updating the Customer Priority standard Salesforce platform picklist field for multiple accounts.
We will create two variables - AccountSingle and AccountCollection.
AccountSingle will be used for the assignment element and added to AccountCollection.
AccountCollection will be used to bulk update records in Salesforce to not hit Salesforce governor limits (to comply with Salesforce Flow best practices)
Now create an AccountSinge variable.
Resource Type: Variable
API Name: AccountSingle
Data Type: Record
Object: Account
Next, create an AccountCollection variable.
Resource Type: Variable
API Name: AccountCollection
Data Type: Record
Allow multiple values (collection): TRUE
Object: Account
Creating Flow logic for List View Button
Once we have all variables ready to rock, let’s create logic.
Add Screen Node to layout
In Auto-Layout mode
Click Plus sign to add a new node.
Interaction -> click Screen
Add Screen Labels
Label: Input Screen
API Name: Input_Screen
Add Picklist Component to the Screen by drag’n’dropping on it.
Label: Customer Priority
API Name: Customer_Priority
Add 3 choices by clicking “Add Choice” button under the Configure Choices button

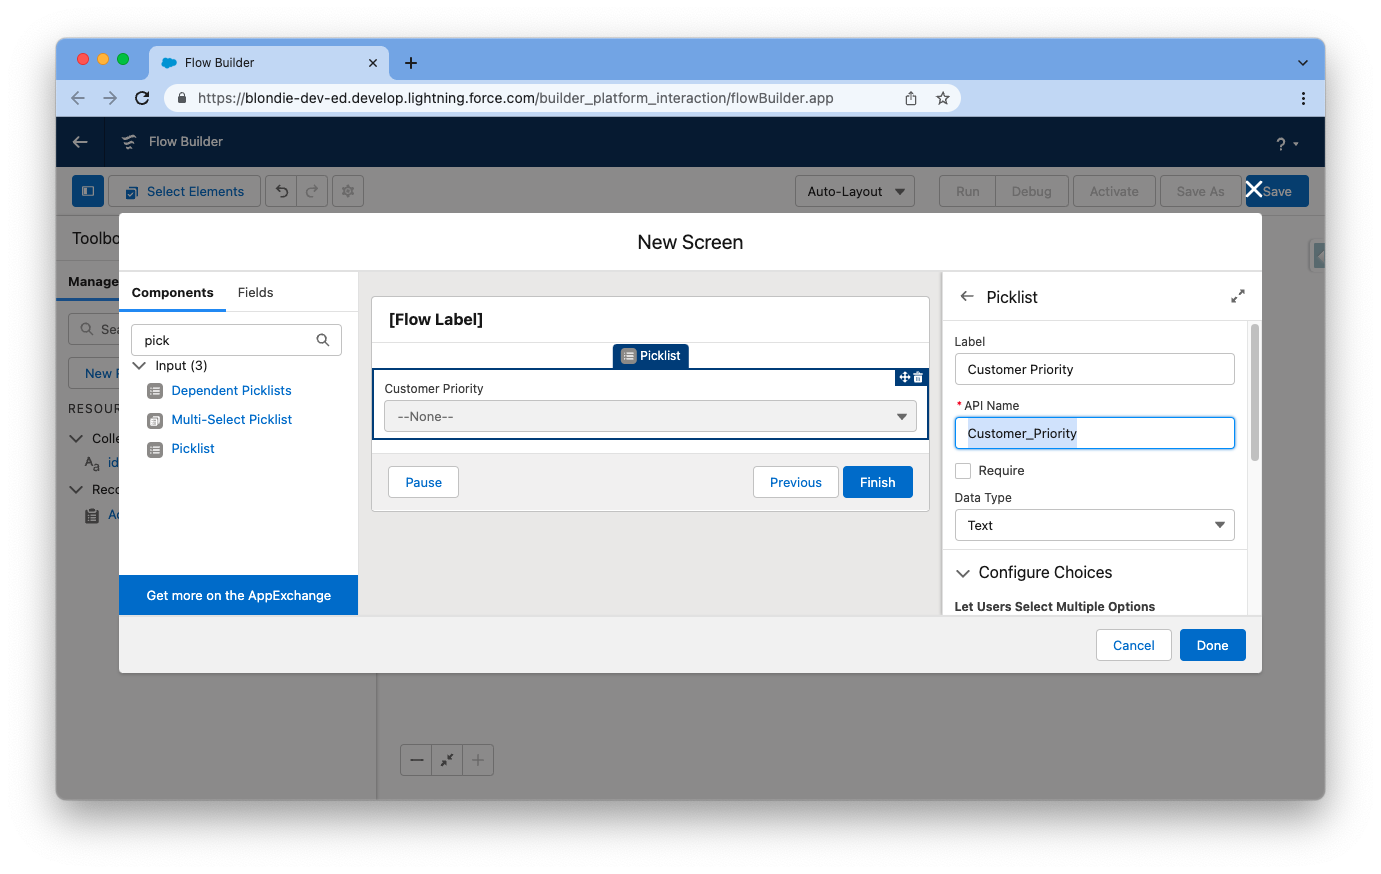
Low
Medium
High
Click Done.
Add Loop Node
Now we will create a Loop, which will use ids variable to loop through all the records we have selected on the List View.
Click Add Element
Select Loop
Create Loop
Name: Loop ids
API Name: Loop_ids
Collection variable: select ‘ids’ collection variable, which we created before.’
Direction: leave as is “First to last”.
Click Done.
Add Assignment Node “Assign Account”
Now we will assign values for the the accounts which have selected on the List View, plus anything we have selected on our Screen Flow.
After Loop element, just under “For Each” label Click Add Element
Select Assignment
Label: Assign Account
API Name: Assign_Account
Set Variable values:
{!AccountSingle.Id} EQUALS {!Loop_ids}
{!AccountSingle.CustomerPriority__c} EQUALS {!Customer_Priority}
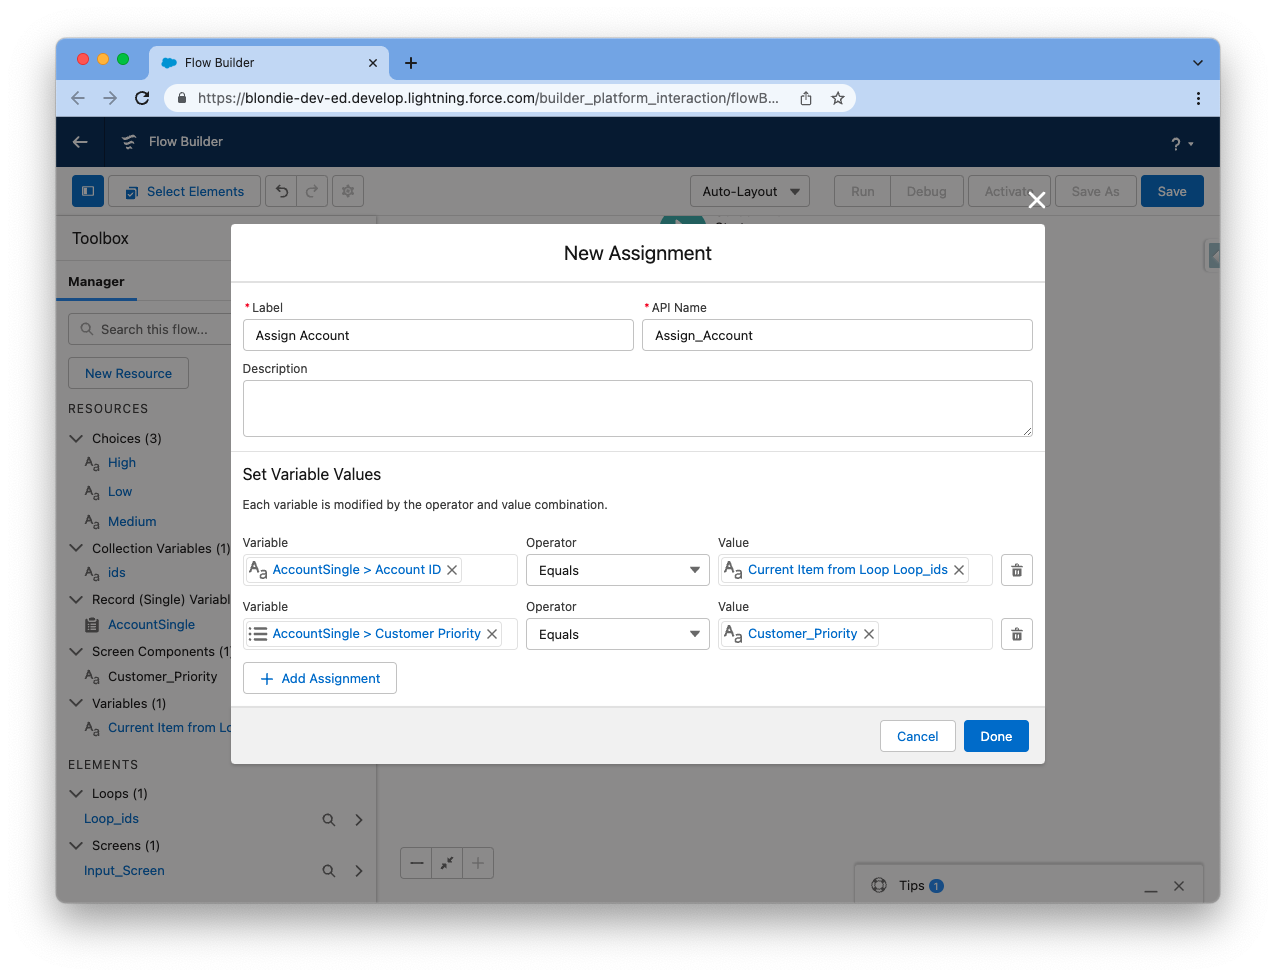
Click Done.
Add Assignment Node “Add Account to Collection”
After Assign Account Click Add Element
Select Assignment
Label: Add Account to Collection
API Name: Add_Account_to_Collection
Set Variable Values
{!AccountCollection} ADD {!AccountSingle}

Add Update Records
Just before the END node, click Add Element and add Update Records Element.
Label: Update Records
API Name: Update_Records
Select Records to Update: {!AccountCollection}

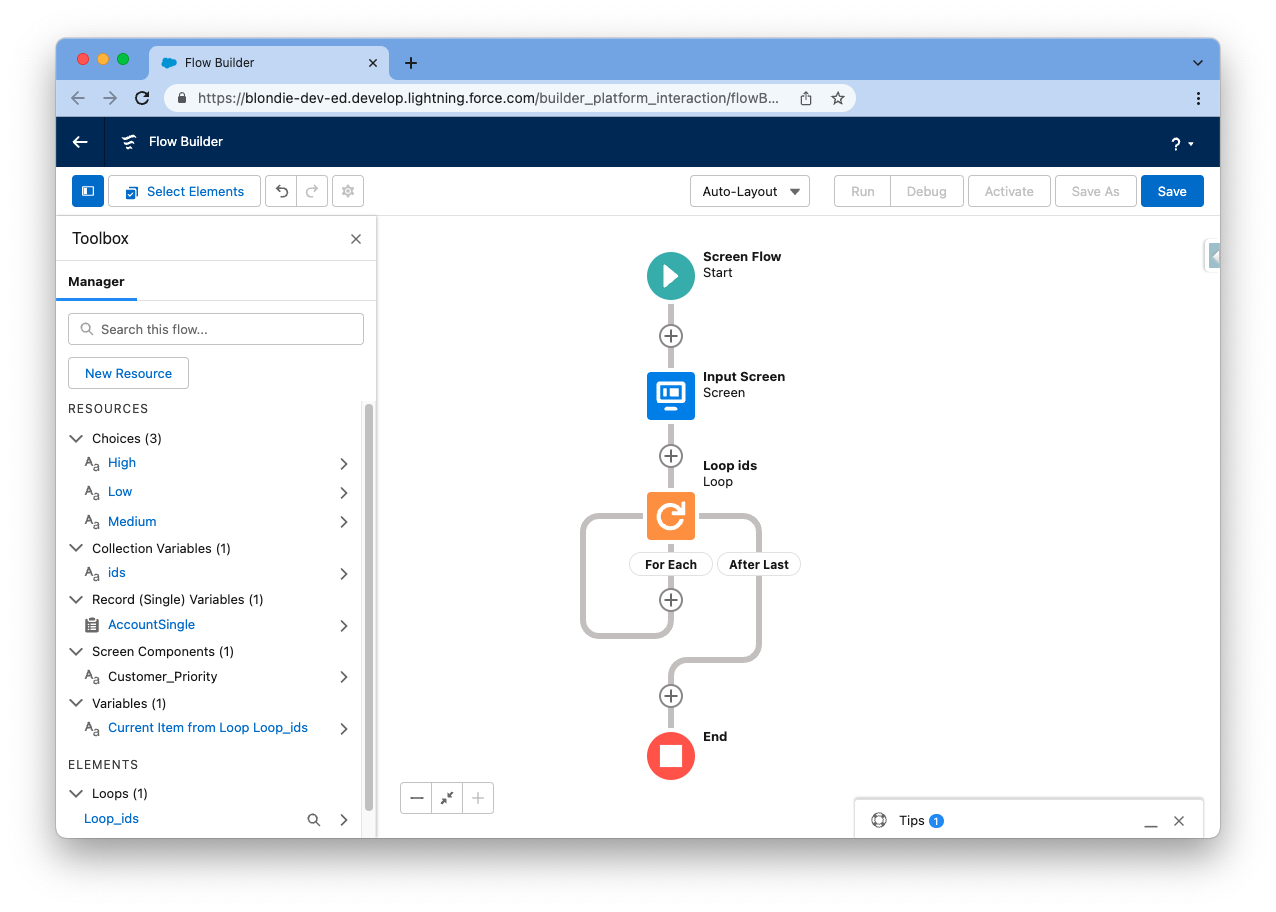
Now you should have a Flow that look like this.

Save and activate Flow
Now, you need to Save and activate the Flow.
Save the Flow
Name: Screen Flow - Update Account Field
Flow API Name: Screen_Flow_Update_Account_Field
Hit Save.
Activate the Flow on the Top Right corner of the screen.
Pass Selected Records from List View to Screen Flow
When we are done with creating our Flow, it’s time to go ahead and add it to the List View Screen.
First, we need to copy a link to our Flow, which we will need later.
Go to Setup -> Flows, and locate your “Screen Flow - Update Account Field”. Next to it click on the Arrow and Click “View Details and Version”
Locate URL of the flow, it should be “/flow/Screen_Flow_Update_Account_Field”. Copy that.
Next Go to Setup -> Object Manager -> Account
Navigate to Buttons, Links, and Actions
Click New Button or Link
Label:
Name:
Display Type: List Button
In the formula field paste URL to the Flow you’ve copied earlier “/flow/Screen_Flow_Mass_Update_Customer_Priority_Field”
Click Save.


At this point, you may wonder, how does Salesforce Flow know which record variable to pass to the flow? The answer is very simple. When you click a List button, selected record IDs are always added in the URL via “?ids=...”. And this is where the ids variable comes into play. Simple as that, yet not documented.
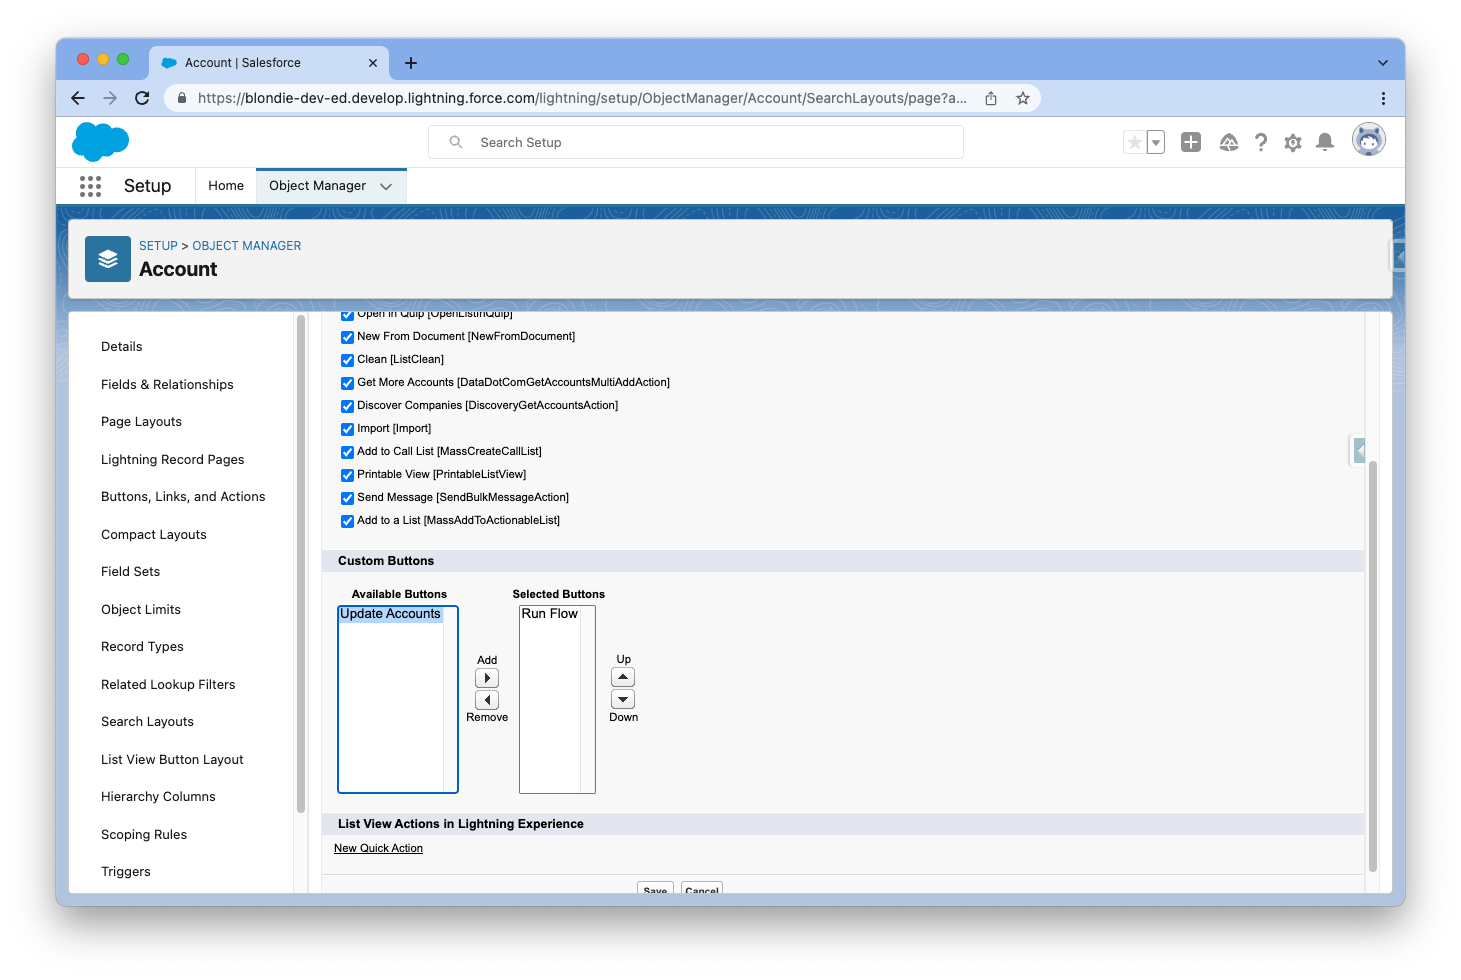
Add Flow List Button to List View
Now there is one last step. We need to add our button to the list view, so users can start enjoying it.
Setup -> Object Manager -> Account, in the sidebar, locate List View Button Layout.
Edit
In Custom Buttons Sections, Select Update Account and add to the Selected Buttons.
Click Save.
Test Your List View Button Flow
Last but not least, you can now test your flow.
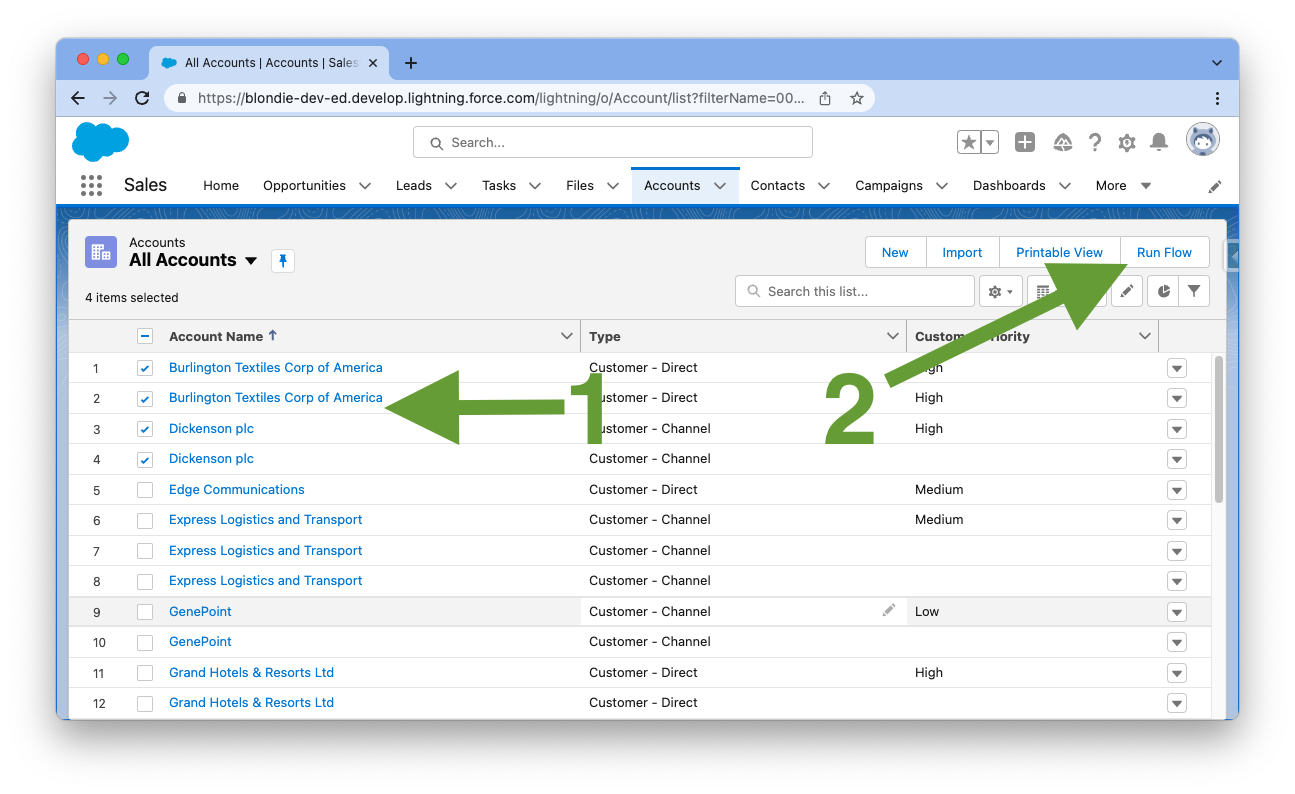
Go to Account
Select the records you want to update
Click Update Account on the top of the screen
And you are good to go!
Thank you for taking the time to read this article! I’d like to thank Lorine Kyler and Blondie Consulting for helping make this content possible. Their expertise in Salesforce Implementation Services makes them an ideal partner for companies dealing in automotive, professional services, and b2b spheres. Keep your eyes on the blog for more updates and insightful content. And don’t forget to let us know in the comments if anything was missed or if you have any questions - we love hearing from our readers! We appreciate you sticking with us, and thank you again for being here.


Great articel! Thank you very much. I tested it and it works but for some reasons, the last record in the collection isn't processed in my org. Could you confirm this behavior also on your side? Cheers!
ReplyDeleteI had the same issue. To resolve this I had to change to "Free-Form" layout and redraw the connections in the loop to make sure the "Assign Account" step occurred before the "Add Account to Collection". For some reason the "Auto-Layout" ran these in the wrong order. Once done, I was able to switch back to "Auto-Layout" without issue.
DeleteGreat work. Thank you for sharing. In addition, Salesforce CPQ certification validates an individual's skills and expertise in configuring, pricing, and quoting solutions in Salesforce. It demonstrates the ability to design and implement complex business processes using Salesforce CPQ. Achieving this certification can enhance one's career prospects and provide opportunities to work on exciting projects in the Salesforce ecosystem.
ReplyDeleteGreat article... Just what I need for a project I am working on!
ReplyDeleteOnce again thanks for this amazing blog. You done really nice work in this article. I must share this one with my good friends. Now it's time to avail vacuum sealer bags for more information.
ReplyDeleteExtremely helpful, exactly what I was looking for and the best explained out of what I have found. Now I just need to figure out how to get it on one list view and not all.
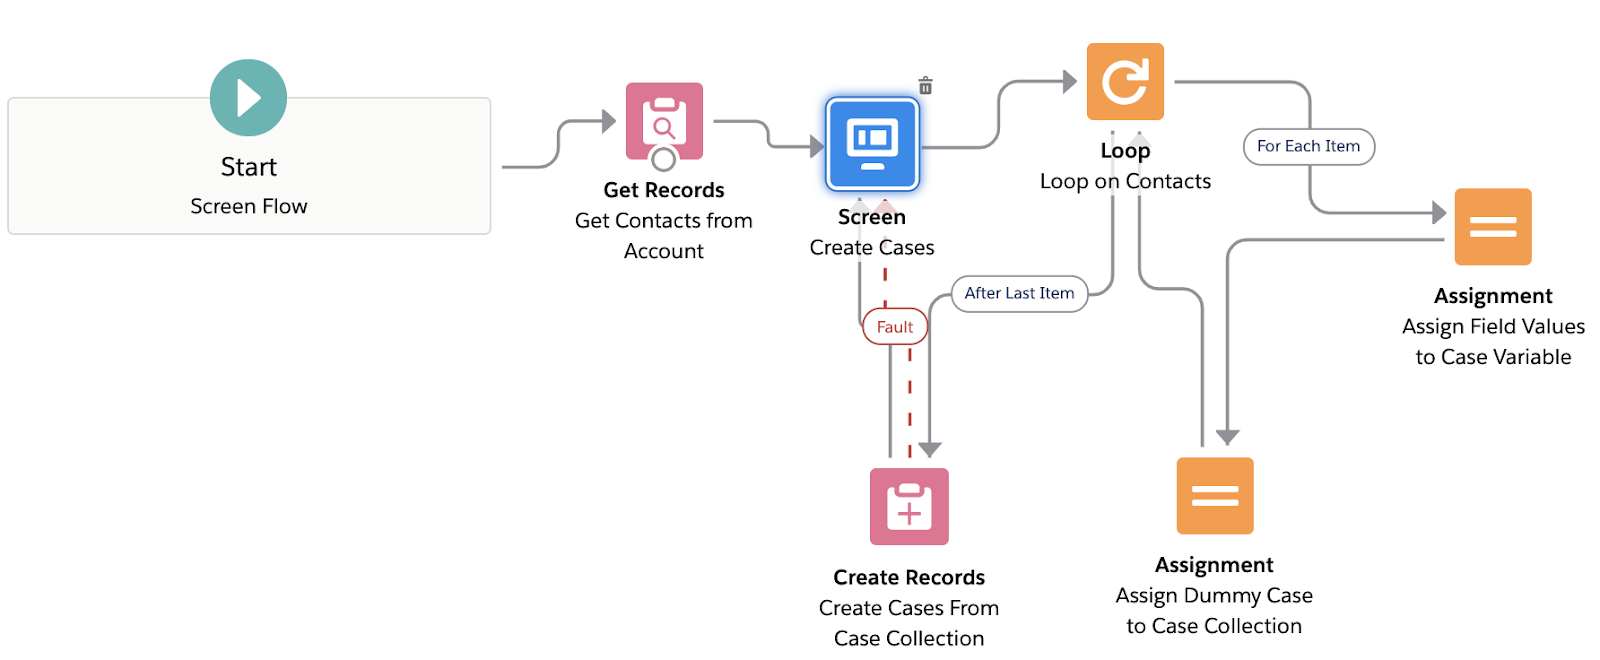
ReplyDeleteFor the last step in the flow, instead of Update Records, I need to Create Records. Do you know the best solution?
ReplyDeleteAny chance you could add a how-to for Related List buttons? This is a little more complex but follows the same principles
ReplyDeleteSecond this request. Create or clone a selected record from a related list and its child / related records.
DeleteFor example, Opportunities is a related list on Account. Click Clone Opportunity on related list and it clones Opportunities and related Cases on Account object.
This is exactly what I've been searching for! Thank you very very much!
ReplyDeleteIs there a way to limit the amount of records selected? Say only 25 records are allowed to be selected prior running?
ReplyDeleteI have one question which I am not able to solve as per my project requirements.. since we are storing all the Id in one single ids . Suppose if I have to show fault message for only the errored out records ..now currently in fault message I am getting both success and failure id due to the collection ids.. please help how it can achieve
ReplyDeleteThere happens to be a flaw in the given approach. The screen element appears infinitely on selection of multiple or single records.
ReplyDeletedoes everyone has this problem?
Deleteuse the retURL to redirect to a default page after the flow run, more info: https://salesforce-flowsome.com/how-to-redirect-users-returl/#returl
DeleteThe retURL is not working for me either. Has anyone resolved this to simply return to the Account list view? Tried this with no luck: /flow/Screen_Flow_Mass_Update_Customer_Priority_Field?retURL=/001/o
DeleteGreat Use case and explanation . Thanks..!
ReplyDeletePrüfen Sie jetzt kostenlos den Goldpreis unter goldpreisaktuel.
DeleteWhen I tried that solution, since URL is encoded by Salesforce ids variable can be passed no more. Am I missing something?
ReplyDeleteFührerschein Kaufen
ReplyDeleteKaufen Sie einen Führerschein ohne Grenzen! Erleben Sie die Freiheit des Fahrens mit einem echten deutschen Führerschein, und das zu einem vernünftigen Preis.
Whatsapp Nummer: +49 1575 8016373
Führerschein Kaufen
Comprar Carta de Condução
Compre uma carta de condução sem fronteiras! Experimente a liberdade de conduzir com uma verdadeira carta de condução portuguesa, a um preço razoável.
WHATSAPP: +351 963 840 372
Carta de Condução Renovação
Rijbewijs Kopen Nederland
Rijbewijs Kopen Belgie. Als u op zoek bent naar hoe u een echt en geregistreerd rijbewijs kunt krijgen in België of Nederland, dan bent u hier aan het juiste adres:
WHATSAPP: +31 6 16588056
Rijbewijs Kopen Nederland
Kupiti Vozačku Dozvolu
Tražite gdje kupiti vozačku bez polaganja u roku od 7 dana? Onda ste došli na pravo mjesto. Vozačka dozvola iznimno je potrebna za kretanje s jednog mjesta na drugo i za samostalnost svakog pojedinca.
WHATSAPP: +385 95 772 9547
Kupiti Vozačku Dozvolu
This tool works by injecting scripts into the game system. These scripts can change how the game behaves or add new functions. For example, they can automate tasks or unlock special actions. It gives users more control over their gaming experience.
ReplyDeletehttps://deltaexecutores.com/
This is a very useful walkthrough for Salesforce administrators and businesses looking to streamline repetitive tasks without relying on custom code. The ability to perform bulk updates through declarative tools not only improves efficiency but also reduces maintenance complexity. Clear processes and well-documented workflows are essential when managing large volumes of business data and ensuring consistency across systems.
ReplyDeleteFor additional professional resources and guidance, visit this site.
What I find most interesting about this approach is the focus on simplifying complex operations through user-friendly tools. The concept of selecting multiple records and applying actions in bulk is a great example of improving efficiency through smart system design. Whether in enterprise software or large digital communities, automation and streamlined workflows can significantly enhance the overall user experience.
ReplyDeleteFor more information and resources, visit this site.
This article does an excellent job of demonstrating how powerful no-code solutions can be when implemented correctly. The ability to automate bulk actions using standard Salesforce features highlights the growing importance of accessible tools that allow users to achieve complex outcomes without extensive technical expertise. Efficient workflows and automation continue to be key drivers of productivity in modern digital environments.
ReplyDeleteFor additional insights and resources, visit this site.
This comment has been removed by the author.
ReplyDeleteThis is an excellent breakdown of passing selected records from a List View into a Flow! Handling collection variables (especially the ids array) can definitely be a bit tricky to configure at first, but your step-by-step screenshots make the process incredibly easy to follow. Thank you for sharing this helpful Salesforce tip! i found some more on [this site](https://delta-iosexecuter.com/)
ReplyDeleteFor additional insights and resources, visit this site.
ReplyDelete