Schedule Flows | Send Emails using Flow in Salesforce
In this blog I am trying to showcase one powerful and useful feature of the flows i.e. Scheduling Flows.We will see how to Schedule Flow in Salesforce
Though this blog is mainly about Scheduling Flows, but we can get an idea about three important things here:
1. How to Schedule Flow in Salesforce?
2. How to Send Emails from Flows?
Some Background:
Scheduled Flows were released in Winter ‘20. They give you the ability to run an auto-launched flow (one that doesn’t have a user interface screen) on a daily or weekly schedule.
Sample Use Case:
As a Customer service manager/supervisor who is not using Salesforce actively, I want to receive an email daily with information like total open cases(if there are any), closed cases etc. in the Salesforce org.
For the scope of this blog, I am only considering the count of open cases scenario but same can be customised and enhanced to include any other details as well.
Overview of the Solution:
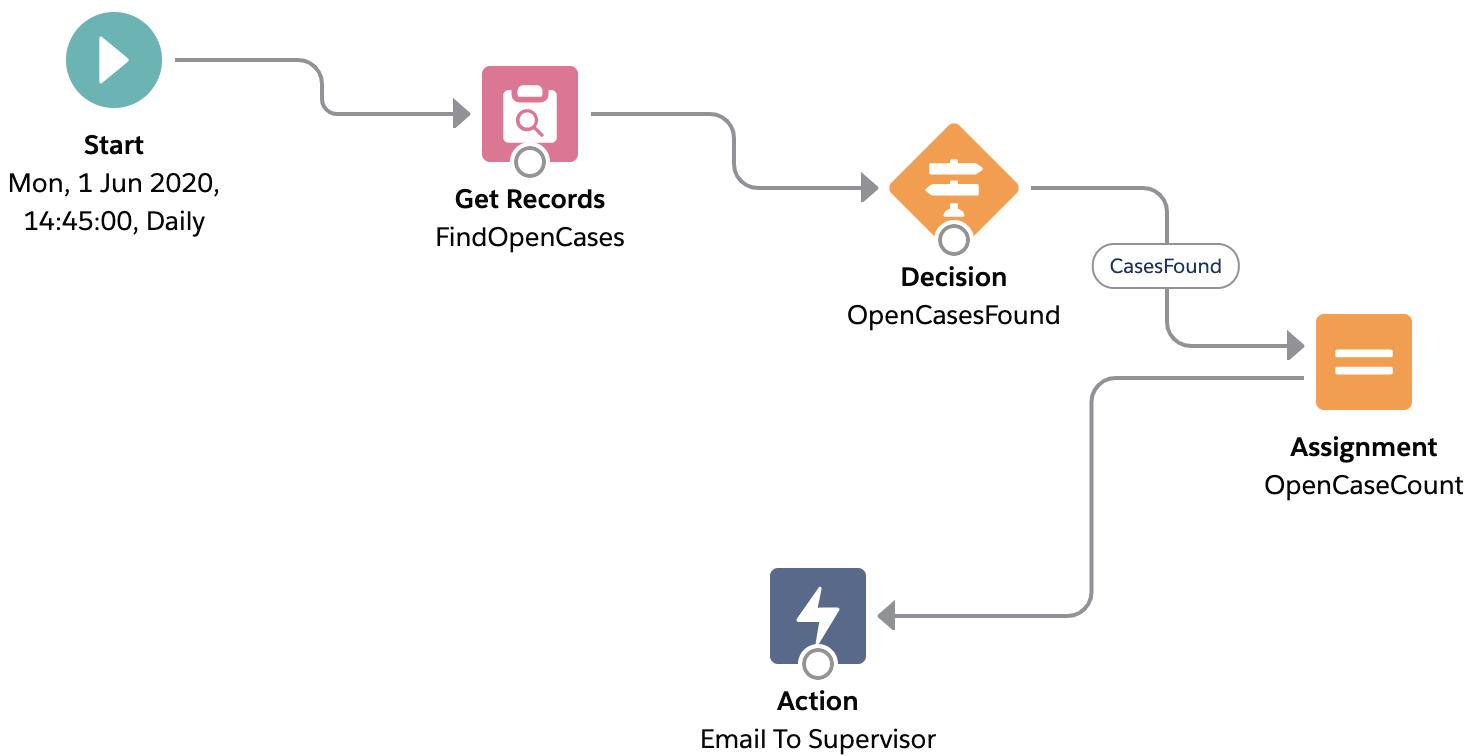
Start Element: Like all flows, we have a “Start” element. This allows us to set the rules around when the flow runs; we will use it to schedule the flow and choose our starting data.
Get Records Element: We will use this element to fetch all the existing open cases in the org based on our condition.
Decision Element: This element is used to check if any open cases were found by the Get Record Element in the previous step. This is an important step because it ensures that flow will only run further if there are any open cases in system.
Assignment Element: If open cases are found, this element will assign the Count of total open cases to a variable which will be used later as a merge field in the email template being used to send the email to supervisor.
Action Element: This is where all the action takes place and an email is sent to the service manager with the count of open cases on daily/weekly basis.
Now let's dive into the play by play action with steps to create the flow.
Double Click on the Start Element after choosing to create a new Auto-launched flow.
Select the scheduled jobs option. Provide details like start date, time and frequency.
Select the scheduled jobs option. Provide details like start date, time and frequency.
Note: Start date has to be in future otherwise flow will not run.
Optionally we can choose the object on which the flow will run. This can also be done in the next step when we Get Records.
Optionally we can choose the object on which the flow will run. This can also be done in the next step when we Get Records.
2. Get Records Element:
Choose the object from which the records have to be found.
Add Conditions: In our case, since we are finding all open cases, the condition is simple IsClosed = False.
To select false, no need to create a new variable as it is available by default in the list of resources.Note: This will not return a single record and will return an array/list of records since we will select All Records in the How many records to save option as shown in screenshots below.
After saving the element ,connect Start element with Get Records Element.
3. Decision Element:
Create a new decision element by dragging into the flow builder screen. A decision has custom outcomes that we can define and a default outcome. We will define a custom outcome because it is based on a specific condition that Open cases are found by the Get Records Element.
 Here we will select the Name of the Get Records Element variable provided in the last step which will be visible by default in the Search resource column.
After selecting that resource, we need to check if this list is empty or not. This can be done by selecting IsNull operator and checking for false as we did in last step for Get Records Element
Note: In the screen Shot below, {!FindOpenCases} is the resource name we provided for GetRecordsElement in the last step.
Join the elements.
 4. Assignment Element:
Create a new Assignment Element. Basically, till now we have got a list of open cases that were found by the Get Records Element. We now need to find the count of the same and assign it to a variable/resource which we can use later to send in the email.
After creating the variable, it is automatically chosen as a default to assign values to it. After this we need to select an operator and assign a value to this variable.
Choosing Operator :This is a very important and interesting step. To find and assign the count for any list of records directly there is an out of box option already provided in the flows.This is under operator and named as "Equals Count".
This is very useful otherwise we would had to run a loop on the case records and assign count value using iterations.
Just assign this newly created variable value as a count of Records returned/found from Get Records Element {!FindOpenCases} in the first step and this will automatically store the count of cases found by the Get Record element in the previous steps.
5. Action Element:
This is where we create the Email Send Capability from Flows.Action component has many action options like record deletions, insert, tasks etc.
This is where we create the Email Send Capability from Flows.Action component has many action options like record deletions, insert, tasks etc.
We will use the Send Email action in the same.
Now we need to provide different Email Attributes just like any other email Alert in Salesforce.
Subject,Body and from and To Addresses.
Body: I have created a new Email Template using the New Resource feature.
Note: We can directly provide the text in this field too instead of creating a new resource for Body.
Important: Salesforce provides the Text Template type resource which is very useful for this type of action. I have chosen this option to create a sample Email Template.
Also, we can have Html/Rich text template and Plain Text. I have currently chosen Plain Text Template.
Subject: Similarly for the subject I have created a new resource of type text and provided a sample text value.
To Address: Provide comma separated to address.
From/Sender Address: This is tricky and important. If not setup correctly, it causes issues and no emails are sent.
In my experience its good to have a from address as a Org wide Email Address. To setup an org wide address as From Email address first select the Sender Type as "OrgWideEmailAddress" and then provide the Sender Address as any existing org wide address which you need to use for this email.
Connect this element with the previous one and we are now done.
Just save and Activate and Flow is ready to test.
Hope this helps!
Don't Miss Latest Posts : CLICK HERE TO SUBSCRIBE TO THIS BLOG
Checkout this Article for all Flow Related Scenarios : All Flow Examples
There are some Important Considerations while Scheduling Flows in Salesforce
Please find them here




Have you ever been able to send an Email Alert in flow? I find using the $Record.Id actually does not work.
ReplyDeleteNo couldn't send using alerts!
DeleteThanks for posting this! I followed your example but I received a bunch of duplicate emails at the scheduled time - any ideas what might be causing this?
ReplyDeleteNice Post. Thanks for sharing. Keep updating
ReplyDeletesalesforce online training
salesforce online training India
ReplyDeleteTechforce services is a Salesforce Consulting Services in Australia Specialising in delivering end to end Salesforce solutions ,Consulting, Implementation DevOps partners in australia We deliver applications and services more rapidly and reliably, but it’s more than a methodology – it cuts to the very core.Salesforce Data Analytics let us help you become a data driven organisation and ensure your data is working hard for your business This includes implementi
Salesforce consulting companies
Salesforce Services
Staff augmentation companies
Salesforce integration companies
Salesforce Implementation services
Salesforce DevOps partners
Salesforce DevOps
Managed project services
Excellent article and this helps to enhance your knowledge regarding new things. Waiting for more updates.
ReplyDeleteSalesforce Tools
Salesforce integration Tools
Wonderful Post!!! Thanks for sharing this great blog with us.
ReplyDeleteWhy DevOps is Important?
Why use DevOps?
Thank you for some other informative website. The place else may just I get that kind of information written in such a perfect method? I have a venture that I am simply now running on, and I’ve been at the glance out for such info. frequency of notes
ReplyDeletewhy you wrote AutoLaunched flow when you're creating Scheduled triggered flow?
ReplyDeleteYour insight on this topic is truly enlightening. It's evident that you've put a lot of thought into your perspective, and your positive approach is both refreshing and inspiring. training for devops
ReplyDeleteThanks for a greaat read
ReplyDeleteGirikon Inc. is a trusted Salesforce consulting partner offering a wide range of services, including Salesforce implementation, integration, and support. With a team of certified Salesforce experts, Girikon delivers tailored solutions to businesses across industries, ensuring seamless Salesforce adoption and maximum ROI. Headquartered in the USA, Girikon is recognized for its customer-centric approach, innovative strategies, and commitment to excellence. Whether you need Salesforce development, customization, or ongoing support, Girikon provides reliable and cost-effective services to help organizations achieve their digital transformation goals. Our Services are:
ReplyDeletesalesforce consultant
salesforce integration services
salesforce implementation consultant
salesforce ai services
salesforce development company
Salesforce Marketing Cloud Consulting
This was great to reead
ReplyDeleteThe world moves fast, and Fivebpeol ensures no one is left behind. By combining technology, human creativity, and deep insights, it helps organizations thrive in change. Fivebpeol stands out as a partner of progress, where every project represents a step toward innovation, excellence, and a brighter, more sustainable future.
ReplyDeleteTabooTube stands out by offering a platform where users can explore themes that are often considered outside the norm. It TabooTube provides access to a diverse collection of videos on various unique subjects, encouraging curiosity and open discussion. This space promotes freedom of expression and understanding, allowing users to explore ideas and perspectives that are seldom highlighted elsewhere.
ReplyDeleteAn SPV Meaning (Special Purpose Vehicle) is a legally separate entity created to isolate financial risk, manage investments, or hold specific assets. In venture capital and angel investing, SPVs are commonly used to pool funds from multiple investors to invest in a single startup, simplifying the investment process and providing legal and financial protection.
ReplyDeleteThis mode is all about grip and control on slippery roads. It tweaks traction and throttle logic so you don’t spin out in snow or rain, which is clutch. But all that traction control tech chewing away at energy means a slight drop in efficiency vs Tour. Do the Driving Modes in the Cadillac LYRIQ Offer Different Ranges or Battery Usage?
ReplyDeleteBeing stuck mid-air only to divert is honestly every traveler’s nightmare 😬 hope United handled the passengers well after landingUnited Flight UA109 Diversion
ReplyDeleteThis is why cnlawblog stands out—no fluff, just relevant legal information explained in a straightforward way. The examples used in this article make the topic much easier to grasp. cnlawblog
ReplyDelete